 Now, before I proceed, I must warn you that I am super imprecise and rarely use patterns. I am the less alluring, non-British Nigella Lawson of sewing. I just make it up as I go along and hope it will pan out OK. I sort of measure, but I often use a book or whatever is lying around to keep my lines straight. My mantra in crafting, which I filched from my personal hero Amy Sedaris, is "Eyeball It!" While this approach can end with a crying jag over my sewing machine, it has generally worked out for me.
So! On to the apron. I started by measuring C. He is a pretty standard-sized tyke. I measured from his waistline to his neck (about 7"), from his waistline to his knees (again, about 7") and his waist (about 22"). Then, I gathered the supplies:
- A 1/2 yard of heavier fabric (you will need more if you are making a bigger apron, obviously)
- A small amount of accent fabric for the big pocket
- 2 sets of D-rings, size 1 1/4"
- Scissors
 Wonder Under (if you want to do a little applique on the top pocket)
- all-purpose thread
- pins
- measuring tape
- needle (to clean up ends)
- iron
- sewing machine
Step 2. Attach D-rings. Attach 2 D-rings to finished end of Piece E by folding it over and sewing securely. This will be for the waist strap. Fold Piece F in half, slip D-rings into crease, and sew securely.
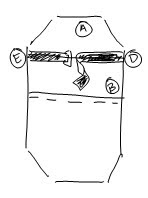
Step 3. Big pocket. Fold accent fabric--Piece B--in half and iron. Line the folded fabric up so that it is upside down against the right side of Piece A, about 1" up from the fold in Piece A. Sew. Fold back up and iron.
Step 4. Attach side straps and sew apron sides. This is a very rewarding step. Make sure that the big pocket is smooth. Now, pin the side straps D and E into the apron,along the top of the big pocket, at the 7"-8" mark. Make sure that the side of the straps that you want to face out is pinned facing the apron. Fold the bottom half of the apron up and pin, foming a sort fabric pita pocket with the straps and pocket inside. Sew. Unpin and turn the whole thing right side out. Now your pocket and straps are attached! You are in the home stretch.
Step 5. Attach top pocket and sew divider into big bottom pocket. First, take Piece G and fold it, right sides in, and sew along each short side. Turn it right side out. You should have a piece that is finished on three sides and open on the fourth. Position this upside down on the bib of the apron and sew along the unfinished edge. Flip it up and sew along each short edge to attach the pocket. At this point, I attached an applique that I cut from the accent fabric using the Wonder Under. Then sew a line down the middle of the big bottom pocket to form two pockets.
Step 6. This is it! Attach the neck straps by folding in the unfinished top edge of the apron. Position Straps C and F on either edge of the top and pin. Sew along the top to secure everything.
When I gave the finished product to C., he said, "Mama, you made it-- for me?" And really, isn't that all the thanks you need? He wears it all the time, even with his pj's, as you can see.


