November 30, 2011

a handful of handmade holiday picks


Christmas Cardinal Purse: Handmade Applique Cardinal Coin Purse- Holiday Gift For Her- Red Tartan, Blue, White- Winter Birdwatching
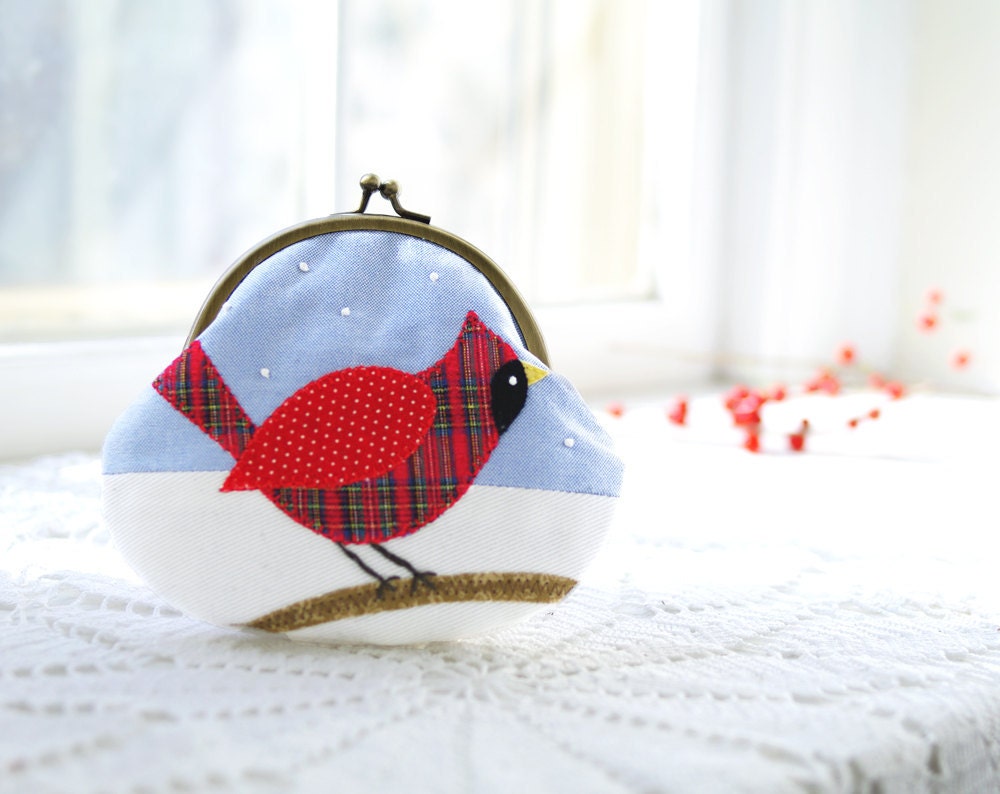
Christmas Cardinal Purse by Chirp and Bloom
One of the real joys of a handmade business is the direct line of communication between the artist and the customer.  As a buyer of handmade goods, I love having a chance to talk to the artist, get a sense of the process, or read about them online.  As a seller, I similarly delight in knowing exactly where my little creation is going to end up, be it down the street or on the other side of the world.  I imagine a little boy in Korea opening up his car mat, and another little boy in another time zone doing the exact same thing--they will both make the same rumbling and screeching noises as they push their toy cars over the roadways, though they may use different words to say thank you for the gift.

With the holiday season upon us, I thought I would point you in the direction of a few artists who I really feel ooze joy and creativity with their offerings for children.  And I do mean a few-- there is so much to choose from, and isn't that wonderful? 

Becky of Chirp & Bloom is an apparel designer who has branched out wonderfully to purses (like the adorable one above), sachets, and other additions to her line of gorgeous clothing for kidlings.  You'll love her use of traditional sewing techniques and vintage fabrics.

Natural Wood Toys-  GINGERBREAD Man Cookies Set
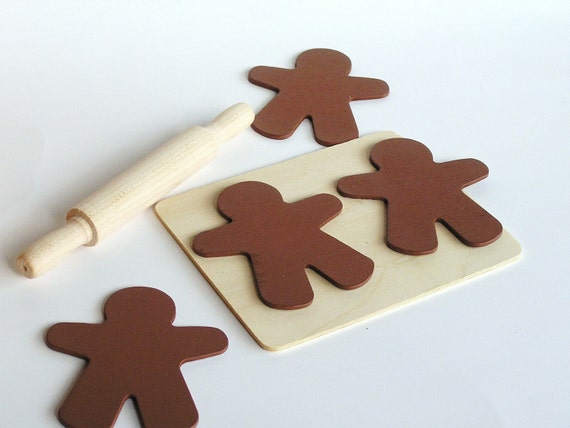
Apple n Amos will knock your socks off with beautiful wooden toys that are designed for learning and fun, like this sweet gingerbread cookie set.  Many of the toys are painted with a non-toxic, water-based wash and sealed with beeswax.  Wooden toys aren't the only thing you'll find in this shop--look for handsewn and crocheted items as well.
FIVE LETTER custom hand painted alphabet name train keepsake made to order
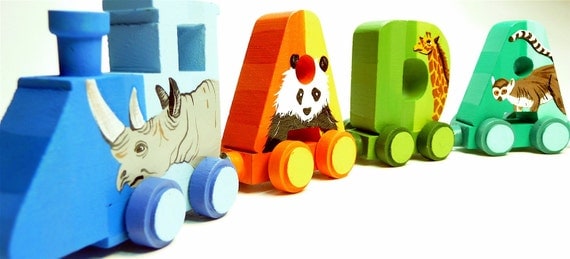
For a fun twist on the personalization trend, I love these handpainted name trains from Vibrant Trains.  Boys and girls alike love trains, and these bright and colorful name trains would also make wonderful nursery decor.
I hope that some of these finds will encourage you to look to the handmade market this holiday season for that unique gift that will be appreciated all year long!

October 24, 2011

make a retro fall wreath

My boys and I are always dreaming up projects to do in our downtime, and they recently decided that we needed to make a fall wreath.  My oldest especially has been very intrigued with the idea that wreaths announce the seasons--a few weeks ago, placing a large apple that he made at school on the door, he announced, "It's apple picking time!"  They were emphatic that leaves should be the focus of this wreath.  I think that what they really wanted to do was take actual leaves and glue them onto a wreath (which could, theoretically, be beautiful, but when executed by 2- and 4-year-old boys, would look like the forest floor).  By the time we got to the craft store to pick out some supplies, they were fully on board with my dreams of handmade pompoms and wool felt.  The beauty of this project is that you can customize it in a million different ways.  It would be lovely to do this in monochromatic shades, for instance.  Or imagine adding some felted acorns or a beautiful felt bird.  I let go on color choices and let my boys make those decisions, but I still love the way it turned out.  The major plus of this project was that all of three of us worked on it together, and we could have used even more helping hands, so it's a nice full-family project.  And though the orangey hues are reminiscent of Halloween, this is transitional enough to last us right through Thanksgiving.

Materials
  • Pompom maker (available in the knitting section at the craft store--I bought two so both boys could work at the same time)
  • 12" wreath form
  • 2 spools grosgrain ribbon
  • 1 skein multi-colored yarn
  • 2 sheets wool felt
  • needle
  • hot glue gun
  • leaves from your yard and/or leaf template
Directions
  1. If you need a ribbon to hang your wreath, attach it to the wreath form now.  Use the grosgrain ribbon to wrap your entire wreath form.  We used a few different colors of ribbon.  Secure the end with a dab of hot glue.
  2. I loved making pompoms as a
    kid.  We are thinking up all sorts
    of uses for our new tool! 
  3. Collect leaves from your yard and trace them onto paper (or simply use the leaf template).  Using the template, cut the leaves out of wool felt.  We cut out nine walnut leaves and three oak leaves for our wreath.  Using the needle, create a simple vein with the yarn through each leaf.  No knots needed--the yarn will stay in place thanks to the thickness of the wool felt.
  4. Create your pompoms.  We made seven large pompoms.  This is great for developing those fine motor skills, too!
  5. Using the hot glue gun, attach the pompoms and leaves in groups around the wreath.
This is definitely an adults-required project, but we had so much fun with it.  I hope you do, too!

October 14, 2011

party planning for the sippy cup set

For his 4th birthday, my son had some very clear ideas about what he wanted--a dinosaur mystery party.  But when I asked him what that meant, he told me that it was a secret.  Of course, I wanted it to be perfect for him, so I got to work anyway.  We came up with a party plan that was totally dinosaur mystery-themed and kept everyone busy, happy, and well-fed.

We are firmly in the home-spun party camp.  I certainly have no problem with kids' parties that are hosted at a kid-friendly venue, and we love to attend them, but as a family, we prefer to host our celebrations at home.  Ultimately, we pulled together what I thought was a very fun and creative party that everyone on our guest list, from nine months to ninety years old, enjoyed. 

Herewith, some tips for hosting kids' parties that anyone can try:

I made this dino-themed invite,
along with matching thank you notes,
and printed it onto card stock for
mailing.
1. Set the tone with your invitations.  I have mentioned this before, but it is really helpful for your guests if you give some hints about the event and about your child with the invitation.  Especially as your child gets older, not everyone attending will know exactly what interests the birthday boy or girl has.  Guests like to know what to expect and how to dress, and they like to have a little direction when choosing a gift.  And keep the length of the party short and sweet for the little guys.  With this age group, less is definitely more!

A guest completes her dino mystery puzzle.
2. Keep 'em busy with stations.  It works at school, so why not at a birthday party?  We set up four themed stations: Dino Chomp, Dino Dig, Dino Match, and Dino Dash.  At each station, the kids had to complete a task to earn a puzzle piece (these were color-coded) that would solve their "dino mystery".  The tasks were simple but engaging, and the kids loved having a challenge to tackle.  Every child was occupied and engaged.  This took a lot of planning and work, but it paid off.  A friend of mine has since used the same approach at her son's party with a car theme, and it worked just as beautifully for her.

3.  Know what to have someone else take care of.  Originally, I'd planned to make dino-shaped sandwiches and the cake.  But as the stations took up more of my time, we decided to outsource the food.  We ordered pizzas, including specialty pizzas for the adults, and I bought a simple cake at the store and decorated it with a dinosaur play set that we rinsed off afterward.  Everything tasted great, the kids loved it, and it was one less thing for me to worry about. 

4.  Try a non-traditional favor.  There's no question that kids love favors.  But it's o.k. to think outside the goody bag.  I first realized this when a friend of mine gave an audio book to each child or sibling group at her son's party.  She had gotten a good deal and the cost per guest came out to the same as that of a traditional goody bag.  My children thought it was terrific.  For this party, I traded with my friend Becca of Bee Sweet Cookies, and she made an amazing personalized stegosaurus for every guest.  A major hit.

Overall, the most important thing is to go with the flow and really think about what your child and his or her friends will enjoy.  Happy kids always make a great party.

October 3, 2011

outdoor spaces

It has been a soggy, mercurial fall here in our neck of the woods, and I find myself longing for crisp, sunny fall days.  The fact that going outside requires a pair of wellies at the very least (though many days some sort of sea-worthy vessel would be more useful) makes me appreciate the outdoor space that we have at our disposal.  In my mind, some sort of outdoor space is essential to human wellness, whether it's your own yard, a nearby park, or even your landing on the fire escape.  Like plants, we need light and air to grow.

My home is situated on a not-too-huge and not-too-small corner lot, but I love the woods that our yard rolls into and the expansive feel that it has.  When we bought the place more than a few years back, the home had been neglected and was overgrown with scraggly shrubs and forlorn azaleas.  Over time, we have resurrected some things, moved other things, and done a lot of planting, pruning, and nurturing.  I am fortunate in that my father, mother-in-law, and grandmother-in-law, all avid gardeners, have taken an interest in our ongoing project and are always willing to lend a hand.  The resulting space is a rambling, wild space, something that brings us joy and comfort. 
Our outdoor space is nothing fancy, but some of our most peaceful, carefree, and balanced family time is spent there.  It has grown along with our family and I feel a deep connection to it. 

Do you have an outdoor space that inspires you?

September 11, 2011

old school

Lately, my four-year-old has been getting frustrated with his drawings.  He can't get them to look like the rich and complex images he has in his head, and it annoys him to no end.  A kid who used to fill every square inch of his sketchbooks, he's been pushing the paper away, saying, "I want you to do it."  I thought that maybe a simple drawing book would kick start his creative engine--something with instructions simple enough for him to follow on his own, that would give him a way to make representational drawing that better reflected his ideas and give him the confidence to move forward.  That's how I rediscovered Ed Emberley.

Ed Emberley is a Caldecott Medal-winning Massachusetts artist and writer who has published scores of books.  If you were a child in the 70's or 80's, you would probably recognize his work even if you don't recognize his name.  My art teacher mom is a big fan, and I have great memories of making thumbprint drawings like those in his book Ed Emberley's Complete Funprint Drawing Book.  His drawing books for children take basic shapes that young children can easily draw and shows them how to combine them to create a million different things.  No reading necessary!

After mulling it over as if I was choosing a spouse, I settled on Ed Emberley's Picture Pie as our jumping-in point.  The concept of this book, originally published in 1984, is that a whole world of creatures can be created by taking a circle and cutting into eighths or quarters, then reassembling the pie pieces in certain ways.  My kids love punching circles and using their little scissors, so I knew they'd love this book, and I liked the math element as a kind of added bonus.  When the book arrived in the mail, my sons both spent hours poring over the colorful images.  Emberley's tone is gentle, empowering, and accessible.  We got ourselves a big pile of scrap paper and got to work.  My two-year-old needed a bit of assistance, but both kids were absolutely thrilled with their work and as busy as little bees.  This book has now become a part of our daily routine.

No matter the age of your children (or yourself!) this book has something for you.  Emberley's shapes would be fun to decoupage, applique, or quilt.  You could make the shapes from felt and allow your children to assemble them on a felt board.  Use tissue paper on wax paper, brushing the glue on, and make a stained glass for the window.  You could use any kind of paper at all--old catalogs and magazines, greeting cards, product packaging--the variations are endless! 

I'll be picking up more Emberley books for our house, and I hope you'll try one out in your house, too.

August 27, 2011

Beck & Lundy


One of the many exciting trends to emerge in sewing is the ability of artists to design their own fabrics through awesome small-quantity fabric printers like Spoonflower. It was on Spoonflower that I first noticed the work of Patty Sloniger.  As you can see from her Ghostly Squid Damask on this iPhone case, her work is very noticeable!

Now located in Texas, Patty is an illustrator and package designer who finds inspiration in her Maryland childhood. In fact, it was her Maryland upbringing that influenced the design of her new fabric line for Michael Miller, which includes a fabric based on this print, Windy Day.  Her line, Backyard Babies, won Spoonflower's Project Selvage contest earlier this year.  In the incarnation that won the contest, it was a really diverse collection that was just overflowing with Patty's signature illustrations.  One of my faves featured bug jars with different insects.  Her drawings are so evocative that you could almost picture the child collecting his or her prized specimens.  I can't wait to see the finished line which will (I believe) be available in both boy and girl colorways.


In her Etsy shop, Beck & Lundy, you will find this print along with other gorgeous textiles featuring her stunning and whimsical artwork, like this tea towel calendar. Look for a 2012 version coming soon!


Patty is truly an artist to watch.  She is also a terrific example of an artist who is taking advantage of all of the creative opportunities that the information age has to offer.

July 25, 2011

lori + eric

My friend Lori just got married to her longtime love Eric.  From the moment of their engagement, the fun couple knew that they wanted a refined yet laid-back feel for their wedding.  They quickly settled on a Chesapeake Bay marina for the site and decided to infuse a subtle beach theme throughout the affair.  Lori kept the look simple and lovely-- pops of color on a white backdrop.  She enlisted my help with some of the details, and I thought I'd share a few of them with you here because everything turned out so nicely.  Thanks to Betsy for the photos in this post!

The yellow and blue color scheme was evident in all of the couple's print pieces from the bridal shower on.  A cohesive design concept from the very beginning really helps set the tone for an event. 

The night before the wedding, Lori gifted each of her bridesmaids with a totally unique Beeps' Peeps beach tote made in fun fabrics chosen to suit each girl's personality.  She gave miniature versions to her flower girls.
 
In lieu of a traditional guestbook, guests signed this platter for the happy couple.  I personalized the platter ahead of time at a local paint-your-own pottery shop, and guests signed with special ceramic pens.  The platter will be baked in a regular oven to make the signatures permanent.  We made sure to place clear directions on the table and provide plenty of pens.  What a wonderful keepsake!

We adapted digital papers from Two Peas in a Bucket to make these placecards.  Lori purchased the beachy photo holders from The Knot.

Our adapted digital paper worked beautifully in inexpensive Ikea frames to serve as table numbers.  The florist combined single blooms, beach glass, and candlelight for stunning centerpieces.


July 7, 2011

sugar & spice

I have long wanted to do a very simple playdress for very little girls.  My friend Lily at Beatrice & the Bird designs glamorous dresses for grownups that feel like playdresses when you wear them, so I wanted the same idea of a super comfy dress that can be worn in any situation.  Something that would be easy to get on and off (for mom and dad) and durable enough for heavy duty play, something to be worn on its own or over tights and a long-sleeved onesie.  I also wanted to make it truly reversible to maximize use and also for those moments where your precious little one has just smeared jam all over her dress and you are about to walk into a nice party.  After quite a bit of experimenting, I have come up with a design that fits the bill.  With the help of a small (and I do mean small in this case) army of fit models, I'm ready to release the Reversible Everyday Jumper in sizes 6 mos, 12 mos, 18 mos, and 2T.  I will be bringing them to the Ballston Arts & Crafts Market this Saturday, and I am so excited to hear the customer response.

June 26, 2011

shoes glorious shoes

3 Women Shoe Patterns-DIY- Computer Download- Sizes 5-11


There is a certain type of sublime retail experience where you stumble upon something you didn't know you needed until the moment you behold it and then you just know you can't live without it.  You feel the flush of excitement and anticipation, that you are the only person who even knows about this thing that you have just discovered.  Must have been how Lewis and Clark felt.

That is how I felt when I found Shoeology.  This shop sells pdf patterns to make your own shoes.  This has been a crafty fantasy of mine since I was little and now it is going to come true!  Sure, I've made baby shoes from a very cute Amy Butler design, but this is a whole new ballgame.  My mind is racing with ideas for materials and finishing touches that I can add to my very own stable of handmade shoes and slippers.  Family and friends, clear out your Christmas stockings!

May 29, 2011

Roman holiday: a photo essay

My lovely sister recently took a trip to Rome, and she took some of her favorite Beeps' Peeps items with her.  She is a frequent inspiration for my designs as she balances work, family, and friends with style and grace.  I love to design with her and women like her in mind. 

Now, without further ado: Beeps' Peeps goes to Rome.


Over the past seven or eight months, I have been developing a line of handbags called the Lucia.  The name of the line comes from a Christmas tradition in my family, the making of Lucia buns, that began when my sister played Santa Lucia in a pageant.  More on that some other time--I'd love to pass along the recipe.


The Mama Lucia is a great roomy bag with a zipper and lots of pockets.  The fabric used here is Lilly Pulitzer's Scales and Tails.  It's a funky, atypical print from Lilly, a departure from her normal look.  By the way, her new print, Dark & Stormy, is spectacular.

Everyone in my family got shoe bags for Christmas--an adaptation of the bags that I made in the drawstring bag tutorial.  Meggan's was in this beautiful Riley Blake fabric.  It's always smart to carry an extra pair of shoes when you're in a walking city.  You never know when your shoes might start rubbing you the wrong way!  You don't want to cut your sightseeing short.


The travel tray is a new item at Beeps' Peeps that is exactly the type of thing that's nice to have on a trip--lightweight, super functional, and warms up the hotel room a little. 
Hope you enjoyed this postcard from Rome.  Ciao for now!

April 12, 2011

easy-to-make drawstring bags

We have a situation in my house: too many toy sets with lots of parts that are too easy to mix up with the other toy sets with lots of parts.  The answer to our dilemma?  Easy-to-make drawstring bags.  It's always nice to find a storage solution that's simple for the whole family to use, and the uses for these handy bags are certainly not limited to toys.  They are perfect for travel or the gym and can be used for makeup, crayons, cell phone chargers . . . anything that just needs a home.  These directions are for a 10" x 10" drawstring bag, but you can simply adjust the measurements to make a bag that is larger or smaller.

To make one 10"-square bag, you'll need:

1/3 yard quilting weight fabric (you will have enough fabric leftover for a second bag)
1 yard ribbon or cord
Sewing machine
Scissors
Iron
Straight Pins
Large Safety Pin

Directions:

1. Cut the fabric into a 12" x 22" rectangle. 

2. Fold in half, right side of the fabric out, and iron the crease.  Measure 2" down from the top and pin. 
 
3. Sew the two sides, leaving the 2" margin unsewn.

4. Trim the fabric around the two sewn sides to about 1/4"

5. Turn the bag inside out and press.  Sew the two sides again to enclose the seam (but still leave that 2" margin untouched).  Snip threads.

6. Now you will make the sleeve for the drawstring.  With the bag still turned inside-out, fold the edge of the 2" margin back and press.  Next, fold a 1/2" margin down all along the top and press.  Finally, fold the fabric down 1", press, and pin. 

7. Sew around the entire top of the bag.
8. Secure the safety pin to one end of the ribbon or cord and use it to thread the drawstring through the channel.

9.  Remove safety pin, tie the drawstring with a knot, and trim the ends.

10.  Fill your cute bag and enjoy!

April 8, 2011

blue and white delights

It seems that the blue and white color combination has enjoyed a nice little resurgence this season.  And why wouldn't it?  It hits so many marks--it can be nautical and fresh or classy and refined.  It walks the line of masculine and feminine beautifully, making it the perfect color scheme for any dual-gender household. 

Growing up, our good china was this Wedgewood pattern, featuring the blue and white design with little hits of orange and yellow.  I was over the moon when my mother passed it along to me.  At the beach, Blue Willow is the pattern of choice at both my parents' and my aunt's homes--it is a tradition that began long ago with a collection that lived in the family beach house before any of us did.  We even hd a storybook that told the tale associated with the pattern.  In our home, for large get-togethers, we always use the huge service of old A&P Currier & Ives dishware that I bought at an estate sale when we first moved into our house. 

My dining room/ workspace is decorated in the vein of Monet's dining room at Giverny, with blue and white and a healthy splash of yellow.  A large blue and white china chandelier anchors the space, and some of our best transferware is hung on the walls.  I store my work supplies in a large cupboard, originally used to store jam, that my husband's grandfather painted the perfect shade of blue decades ago.

The other day, I saw that a friend of mine had listed a lovely nautical dress and I went on a blue-and-white treasure hunt.  I found so many lovely things.  This truly is a timeless look that can be used in so many applications.

March 20, 2011

a little help


Like so many others, I am heartbroken by the recent events in Japan.  In the face of such tragedy, it is difficult to find a way to help, but I have been inspired by the efforts of those around me.  The students in the middle school where I teach have raised $868 to donate to the Red Cross.  Many of my fellow crafters have also jumped into action.  A Tennessee grandma (and EtsyKids member) immediately organized a collection of handmade items for children to be sent to Japan with Save the Children.  And Namoo and Tarabu of the Baltimore Etsy Street Team are auctioning off a package of pillows and cuddlies to benefit the victims of the earthquake.  I had an opportunity to see these items first-hand and they are exquisite!  I loved that Namoo used Japanese linens in her pillows and that Tarabu's cuddlies had little bento-box inserts in homage to the country they are seeking to help.

I have decided that I will follow suit.  In my etsy shop, I have two bags made of Japanese designer Etsuko Furuya's gorgeous Echino Patchwork.  One is a lovely pleated Lucia handbag and the other is a large shopper.  I will donate 100% of the proceeds from the sale of these two items to Doctors Without Borders, an organization that has sent medical teams to support the tsunami and earthquake response efforts in Japan.

Please consider purchasing one of these items--not only will you be the owner of a chic bag, you will be supporting a worthy organization in its relief efforts.  And every little bit truly does make a difference.

March 10, 2011

a cheerful treasury

Woke up to find that one of my invites had been included in this fresh and pretty treasury by The Bitsy Beau.  Yellow and gray are so nice in the early spring, when everything is just waking up and the color riot that is about to start is still biding its time.

March 9, 2011

gearing up

Just checking in quickly with an update on the party prep.  Like I said in my last post, we are keeping it very simple.  The nautical theme that was launched by the preppy whale invites has now morphed into a color scheme with a nod to the nautical in some of the details, including the kids' food, the favors, and the cupcake decorations.  The color scheme consists of a range of blues, white, and a nice kelly green.  Cal (the birthday boy's big brother) and I have been working on a banner that we'll use to decorate. 

We are using my Cricut to make the letters that we are using on both the banner and the cupcake flags.  I love the Cricut and thought I got a good deal on it, though every time I go to JoAnn's I have to avert my gaze from the ones they have on sale and tell myself they're not as nice as mine.  Cal really, really loves using the Cricut, and (with a LOT of supervision) it is easy enough for young children to operate. 

I'll post a tutorial on the banner and cupcake toppers when I have a spare moment.  It is simple but graphically pleasing, and I love the idea that the big bro is helping get ready for our little one's party--even if I do suspect that he's in it for some peripheral gifts.

March 5, 2011

thinking like ahab

photo by momp photography
So, my little one is turning two, and we wanted to have a small family party for him. When it comes to the kids' birthdays, we normally seize the opportunity to really go nuts and fill our house with a million people. For Brooker's first birthday, we had a music theme. All of the children decorated little wooden tambourines and had a an epic game of freeze dance. I made two (!) ice cream cakes that we decorated like drums. My friend Kim of a little party made beautiful upcycled garland that we strung up all around the house.  It was homespun with very little fuss, but it was a rager.  I think it's safe to say that a good time was had by all.

preppy whale invitations
This year, we decided to keep it extra low-key and only have a handful of family members over for a nice lunch.  The theme is nautical, and I am definitely not sure what exactly that means, but I'll be blogging about it all week as I figure it out in time for next Saturday's party.  The theme was set by the invitations we used, my preppy whale invites.  I really think that even if you are only having a small party, it's always nice to send out an invitation that lets people know what to expect.  So far, I am thinking of doing a big bright pennant banner in blues and greens and something extra special for the favor since there will only be a handful of kids here.  The ideas are starting to percolate!

March 2, 2011

a sweet blue treasury

I do love a good etsy treasury and this one is full of soothing blues.  Brace yourselves for more treasuries on the ol' blog now that I've figured how to add them AND keep them clickable thanks to the Craft Cult peeps!

February 6, 2011

right on, ribbon!

Last week, I was working on a Market Tote in some very wonderful retro-prep Lilly Pulitzer fabric and I had a moment where I realized it needed a little something to really push it over the edge--you know, give it some real prep gravitas.  What better to give it that oomph than a snippet of grosgrain ribbon?  It did the trick.  I often forget about ribbon, though I love it dearly.  Like paprika, ribbon makes everything better.

So, in a turn of ribbon serendipity, I stumbled upon a type of ribbon that is entirely new to me only days after my Market Tote revelation.  In my last post, I discussed my love of narrative fabrics.  Well, how about narrative ribbon?  Farbenmix is a German brand, previously unknown to me but clearly quite famous.  I have always loved woven ribbon with animals or some other repeated motif, but these designs from Farbenmix are just so detailed.  The lovely Petra of Chickadee Supplies has recently moved to the US from Germany and has an excellent selection of this ribbon in her sweet Etsy shop.  Take a look at this Helga the Happy Owl ribbon, for instance.  I feel like you could build a whole bedtime story around the conversation the two little birdies are having while Helga swoops overhead.  Thanks to Petra,  I now have this wonderful Little Red Riding Hood ribbon coming my way.  I am thinking of a little girl's handbag in red polka dots, with this ribbon as trim.

The moral of the story is, sometimes fun little details make all the difference.  Happy crafting!

January 21, 2011

in my humble fabric-hoarding opinion

A quilt in Marty Goes to Mars
Those who know and (I assume) love me know that my penchant for fabric, which has always been a vice, has in recent years developed into a full-blown instinct to hoard.  I blame the creativity of fabric designers.  I am certainly not an expert, but it seems to me that fabric design is experiencing some sort of wonderful renaissance.  I am especially drawn to what I would describe as "narrative fabrics", fabrics that tell a story or allow you to imagine one.  I am thinking of fabrics like my beloved "Marty Goes to Mars" by Suling Wang (really, do yourself a favor and click on that link). 

I have lately been moved to search for fabrics designed by my favorite artist illustrators and been disappointed to find that it has not been done, or not been done in a way that I can get it into my hotlittlehands.  So, Big Fabric Execs, please make the following available as soon as possible.

Edward Gorey is a no brainer.  Come on, people!  He himself designed strange little stuffies, one of which I actually owned as a child but of course has now gone missing (thank goodness I still have my damned Koosa, though).  Alexander Henry took a stab at the Gorey mystique with his Ghastlies this past fall.  It was a step in the right direction, but I am dying for the real deal.

Turn me into fabric, please!
My next suggestion is Charley Harper.  No, I am not a fan of Two and a Half Men, and if I was, I would be way more on Team Duckie.  A great friend of mine gave my son a Charley Harper floor puzzle, and we are hooked.  There is no Charley Harper fabric that I know of, but I was delighted to stumble upon an amazing quilt design by Angela of The Artists' House.  Unfortunately, I would not be able to applique her design if my life depended on it, but the quilt sure is pretty.

Lastly, a living artist whose work is screaming out to become fabric--Tao Nyeu, author illustrator of the picture book Wonder Bear.  Her artwork creates a whole other world, and it is a world where I would like to live. 

A girl can dream, right?